main menu
?>

Pres. Anthony Answers Questions

Well folks, there are a lot of growers out there full of questions and needing some serious answers. And, here I am doing my best to answer them.

Can I get a plant with a little bud on it in a month time by growing for 1 month then do 12on/12off last month?

No. Any plant or even life form has to go through its natural processes. Asking or hoping for a plant to be done that quickly is like asking for a child to be born at the age of 18. You can’t rush this stuff. Just let nature take its course. The fastest a marijuana plant will grow depends mostly on the genetics of the plant. Even the fastest growing plant I’ve heard of would take maybe three months. And, that’s still the case even when cutting corners.

Hey I’m a new grower and I guess I planted too early because I am going into bud stage. They are out door. Will it continue getting taller through the summer even though it started budding? White Widow x Bubble Gum. It’s good stuff but I’m worried that it wont get any bigger.

It’s difficult to answer this question honestly. I am not an outdoor grower but I have read up on it. Also, I don’t know the area nor the weather fluctuations at the time and that all affects the plants. Chances are you did plant too early. You have to give the plant time to get some hardiness so that it can withstand the elements. Remember, indoors, you control just about everything. Outdoors is a different monster. Moving from indoors to outdoors will shock the plant. So the first week or so, it may not show much. If the plant is young, it may take even longer as it’s roots will need to grow as well. Give it some time and let’s hope they aren’t in too much shock.

My plant the widow/gum produced leaves with only one leaf on them, if that makes sense. There’s over 12 hours of sunlight why are the buds getting bigger and not the plant?

It’s possible that the plant is “auto flowering”. Some plants will flower automatically. Also, it could be the case that the plant may have been so stressed that it’s going into self-preservation mode. That means it will produce both pollen sacs and buds – hermaphrodite – and pollinate itself so that it can stay alive.

Do these little plants still produce seeds?

Absolutely. Plants will be plants.

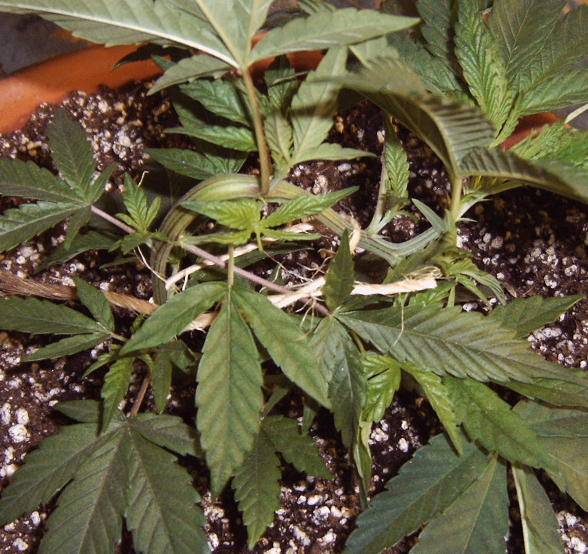
My leaves are yellow. What am I doing wrong?

Yellowing leaves can come from a number of different problems. It’s hard to say without pictures of the leaves. Make sure you join forums or buy a book so that you can identify some problems yourself and adjust accordingly.

How often should I root prune my plant?

Root pruning shouldn’t be done often at all. Once at the most and only if absolutely necessary.

My widow/gum plant still hasn’t grown an inch, the buds have, but its a pretty pathetic little plant. I’ve heard that plucking the buds off will make it grow but the plant is basically 1 bud it will surely die if I did that. Any suggestions on how to get some growth going.

It sounds like it’s a wrap for this little plant. Don’t waste time with it anymore. Don’t be discouraged either. I know a grower that didn’t get it right until his 4th try. Each step he stumbled on was a number of lessons learned. Now he’s growing some damn good Super Silver Haze. So, start over and try again.

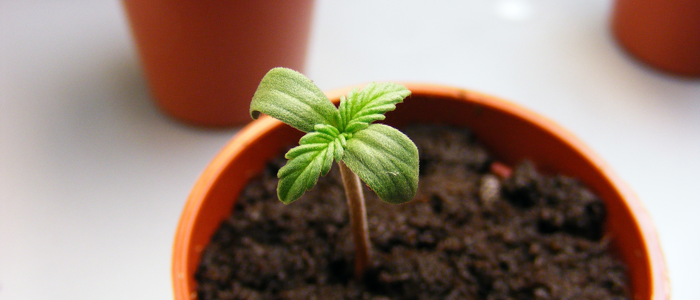
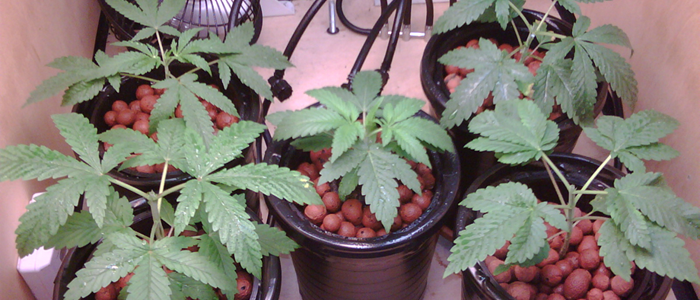
How long would it take to grow the small plants you display on the top? And would this be a good start for a first timer? If so, what are the specific steps in order to do this? Like you said, there’s so many variables to growing, and so many ways to do so. What were the specific steps you took and items you used to grow those nicely done small scale plants.

First, I didn’t grow those plants. The plants displayed at the top are for hobby/fun purposes. I believe those plants may have taken approximately three months to grow. Remember a plant is a plant from the smallest weed to the tallest tree. They all only need air, earth, and water.

Is medical marijuana different than normal weed, or is it normal weed but they just call it that because its not used for recreation purposes but rather used medically to relieve anxiety/pain or whatever. As in if somebody bought weed from a person and smoked it because they needed to relieve stress, is this technically medical marijuana or no?

Well there is really no such thing as normal weed. There are different strains of marijuana and they all can affect us in slightly different ways. So each strain is rather unique. But, to answer your question, it is just marijuana that’s used for medicinal purposes. There’s no special or specific medical-only marijuana. If you’re using for medicinal purposes, you have to find the right strain that works for you. For example, Michelle Rainey suffers from Crohn’s disease. She uses, mainly, Afghani Bullrider to help her cope. That strain is good for her but it may not be what is preferred by someone else with or without the same disease.

This is just an example of the various people who want clean, safe, high quality marijuana. I won’t stand behind medicinal users or act as though I am a medicinal user. But, I think I speak for all marijuana users when I say people want their marijuana. Unfortunately, the black market has control over marijuana so it’s difficult getting marijuana safely from nickel and dime thugs and criminal cops alike.

Remember, the future of marijuana under prohibition is small, quiet, personal grow operations. We can continue growing marijuana in peace and not fall into the trap of supporting this failed War on Drugs by buying Mexican cartel trash weed nor paying government taxes used to wage war on ourselves.

Grow your own.

And, don’t forget to join those forums and buy those books. I don’t know everything, obviously. And, I won’t always be able to respond in a timely manner. Don’t let me be your only source of information. Keep growing.

Anthony’s Marijuana Growing Advice

Grow Your Own Series

  1. Intro
    What to expect and what not to expect from the Grow Your Own series
  • Buying Equipment
    Some “rules” regarding buying equipment
  • Item Lists/Seeds
    Actual equipment/gear for growing marijuana, how it’s all used, and a note on buying marijuana seeds
  • Let’s Grow Something
    Discussing the general life cycle of marijuana from seed to ash and perpetual growing
  • Back to Security
    Reminder on maintaining security once you’re already set up and growing

Other Grow advice

  1. Managing Small Plants
    Although growing small plants is more of a hobby, there are a lot of useful skills that you may use in managing a larger garden.

Essential Knowledge


  • Marijuana Forums
    I can’t tell you everything. A book can’t even tell you everything. But, thousands of growers on a marijuana forum should be able to tell you anything. Join one. Try International Cannagraphic Magazine Forums. Sign up, read the forums while you wait for approval, ask questions only if you can’t find the answer through a search.
  • Local, State, Federal Laws
    Never do anything unless you thoroughly foresee, understand and accept the consequences of your actions. Growing marijuana is still a crime even in California. As long as you can be prosecuted for it by someone, it’s a crime. It’s best we all know and accept that reality. Sure, we can go into a whole debate on it and I’ll agree, under the US Constitution, it is legal. But, guns and money run the United States, not the US Constitution. When you have DEA agents with assault rifles pointed at you and your family, you won’t have a chance to debate anyone legally. And, your chances surviving court are slim to none. Know your rights and the law. If you know what they can and will do, you won’t act recklessly. Find out what the laws are in your state.


I will be updating this from time to time.

Grow Your Own: Back to Security

So, you’ve got your equipment from various places. You didn’t raise any red flags. You’ve started growing and your first crop was AWESOME. You even rolled a 2-gram joint of your own homegrown and it had you floored.

Happily ever after, right? WRONG!

Security continues to be an issue from odor control to police visits to nosy neighbors to friends with big mouths.

Treat your home in layers like an onion.

The core is the marijuana. The closest thing to the core is YOU. First rule of growing marijuana is to keep your mouth shut. No one needs to know what you’re doing. If you have to tell someone, expect to bring them in on the action in some way. A good friend will help you out in more ways than one. You keep him in good weed and he’ll be an extra set of eyes, ears, hands, and muscle. But, keep in mind, you can’t fully control your friend. If anything happens, it was your own bad judgment that pulled him through so many layers.

The next layer is the home itself. You have to do everything you can to maintain the security of the home. The number one offender is odor. The only person in control of odor is YOU. So, if you feel you need to backup or double-up on your odor control, do it. Spend the extra money if you have it. It’s worth it in the long run. Make sure all of your wiring is properly done as well. You don’t want any fires to happen.

After the home is everything that can happen outside of the home. Nosy neighbors may bring pesky police. Thieves may find your grow op and you’ll never get rid of them once they know. So, you have to approach this problem from all sides.

  • Be a good neighbor. Lots of grow ops get popped because neighbors pay attention. Having no neighbors raises a red flag. Someone may come to welcome you to the neighborhood and no answer. Notes left go unanswered. Something’s wrong. Good neighbors respond. Go to neighborhood meetings and so on. Keep your lawn and backyard clean. Good neighbors don’t raise red flags.
  • Be vigilant. Increase your security against prying eyes – physical and digital. Police will not have a problem trespassing in your home or even sending some civilian in there to find something. Get some security cameras for your property to keep an eye on things. This way if some weird person shows up at your home, you’ll know to at least be on alert. Surveillance scares both thieves and police.
  • Never keep anything in your car. I know so many people who keep small pipes in their car or rolling papers. Don’t do it. One slip up and that could land you in jail.

Know your rights. A lot of marijuana growers get caught by their own activities or words in front of police. Think about your answer, be clear, be precise. Don’t give more than what they asked. Remember, “you have the right to remain silent (5th Amendment)” and anything you say “can and will be used AGAINST you in a court of law.” In other words, there is nothing you can tell an officer that will help you in a court of law. Police are not there to help anyone. They are there looking for crime. If they have to make it up, they will.

Check out Barry Cooper’s Never Get Busted. Barry Cooper is a former Texas interdiction officer that was considered Texas’ #1 drug cop. You don’t get that distinction by being bad at catching people. Barry Cooper basically saw the error of his way and

Grow Your Own: Let’s Grow Something

Now that we know how and where to buy our marijuana growing supplies, it’s time to get some…

Marijuana Growing Education

There are three main phases to growing any plant – germination/seedling, vegetation, and flower. I’ll get to harvesting, drying and curing at the end. I’ll also add a bit about perpetual growing which is really the second best part of growing. The absolute best part of growing is, of course, smoking your hard work.

Marijuana’s time schedule depends heavily on the strain and the grower. Overall the time can be anywhere from 2.5 months to 6 months. Indica strains are usually faster growing than sativa strains by about 4 weeks. Hydroponics is faster than soil by about 2-4 weeks. I can rattle off a million examples but it doesn’t matter. You’ve got to find your perfect strain and perfect growing method. It’s al up to the grower.

Lighting, air, and nutrients are important issues. Remember, we are trying to mimic nature.

During germination, the seed will need complete darkness and a warm place as if it were in the earth during Spring when this warm up.

During the seedling and vegetation phases, the plant will need a lot of light to mimic those Spring/Summer days and plenty of nutrients. This is why you’ll need a light timer because you can’t expect to be there to turn the lights on and off appropriately. You can set your timer to 18 hours of light and 6 hours of dark. Some growers use 24 hours of light straight. You’ll stay in the vegetation phase for as long as you like, typically 2-4 weeks.

Flowering occurs when the normal day/night cycle is about even – during the later summer through the fall finishing in the early winter – 12 hours of light and 12 hours of dark. You’ll be in flower from as little as 4 weeks to 12 weeks depending on the seeds you have.

Germination/Seedling

This phase simply covers the first week or so from seed breaking out of its shell to sprouting a taproot up to the first set of true leaves. This will all happen in the first 7 to 10 days. There are many ways to germinate a seed. Personally, I like the tissue paper method.

  1. Wet some tissue with warm water
  2. Fold about 5 to 10 seeds in that tissue
  3. Place the tissue in a plastic bag or baggie
  4. Leave it a dark and warm place
  5. Wait 24-48 hours for the seeds to pop
  6. When you see about a 0.25 inch of taproot, place it in your media (dirt or rockwool)

You’ll come across other methods online, many are good. I’ve tried them all and don’t think there are any that don’t work.

The seed will provide enough nutrients for the plant to grow in this phase. They will look like bean sprouts at first. After you’ve planted them, you’ll see the top of the sprout, open up with these rounded leaves and green up within a few hours. You’ve given birth to a seedling. YAY, but it ain’t over! As the grower, simply water the seedling and let it “eat” its own resources. The plant will use this time to grow its roots into that complex web you may see weeks or months later. You’ll know the plant is ready for feeding when you see the first set of true leaves. Proceed with a very light nutrient solution, 10% of the recommended dose.

The germination phase will take place over a 2 to 3 day period. The seedling phase will happen over the next 4-5 days.

Vegetation

The seedling phase is pretty much over when you start feeding or when the cotyledons start withering. This is when the plant will begin to show vigorous growth. You can start feeding your marijuana and just let it grow. Remember to mimic nature – plenty of light and air.

If you’re in soil, make sure air is flowing through because those roots need to breathe. That means do not overwater or else your roots will be sitting in mud. The roots will use up all available oxygen after which they will suffocate. So, make sure to have set up good drainage.

If you’re in hydroponic solution, make sure your air stone, tubing, and air pump are all working together to keep that water full of air for the roots to use. And, make sure your hydroponic solution is healthy. Don’t be afraid to change out the water and so on.

At the end of vegetation we come to flowering. You’ll reach the end of vegetation when you want. A marijuana plant can stay in vegetation for long time. Since, flowering is dependent on you, flip your light timers to “12 hours of light and 12 hours of dark” aka 12/12. Now, you’re in flower.

Flower

This is where all the fun begins. You’ll spend another week or two as the plant transitions into flowering. Growth hasn’t stopped, it’s just changing tracks, so to speak.

Instead of building more roots and leaves, it’s going to start getting prepared to procreate – pistils and pollen. You will be able to tell a female marijuana plant by its pistils, sometimes referred to as the “hairs”. They’ll be white and coming out of a sort of tiny pouch called a calyx. The pistil catches the pollen which then slides into the calyx. The seed process begins and the calyx is the “womb” for that seed. They’re small but visible. On the other hand, the male will start showing pollen sacks aka “balls” because they hold “plant sperm” and they’re kind of round. Get rid of the males. Remember, they have no THC. We want to concentrate on the females.

At this point, you want to just let the plant keep doing what it’s doing. Keep the top layer and root zone healthy and the plant itself properly fed.

The females will start to grow buds which is just a collection of calyxes with pistils. The fun part starts when those buds and the surrounding leaves start producing THC in what are called trichomes which look like tiny poles with a ball on top. They are much easier to see with a microscope which I hope you’ve purchased from the list of items to get. You’ll be relying on it in a minute.

Harvest, Dry, and Cure

You can tell when the marijuana is ready to be harvested by looking at the color of the trichomes. At this point, it’s all about the trichomes. Trichomes start off clear. As the plant matures, they become cloudy and eventually turn amber or yellowish-brown. You want to harvest around when most of the trichomes in a sample have turn mostly cloudy with a touch of amber.

There are benefits to pulling a plant earlier than later. Without getting into the different sciences that apply, pulling marijuana a little early may benefit those looking for a “head high”. Pulling marijuana a little late may benefit those looking for more of a body high. However, don’t full assume this is how you get the difference between a head high and body high. The real difference is in the type of marijuana you are growing but pulling a little early or late does help depending on what you want.

Once you’re happy with your plant’s progress, cut her down. You have to prepare the plant for drying. Mold is your enemy here. Mold likes warm and humid places. Stagnant air only helps their process even more. There are many methods to drying but hanging them upside-down in a cool, dark, dry, airy place does the trick. Depending on how much marijuana you have, this may take weeks. But, we’re growing personal and if you don’t have too many plants, it may only take a few days.

Pull a sample bud from your plant. Record the weight. I hope you bought your scale. You’ll know when you’re plant is dry when that bud’s weight is about 20% of the original weight. It will go down quickly. You don’t want it to go down too fast however, too slow may bring problems. Just remember to keep air flowing and the area dry. You may want to check your buds from time to time just to make sure they’re ok.

After you’ve reached that all important dry weight, this is where you want to cure your marijuana. Curing is not necessary to smoke the marijuana. Once it’s dried properly, it’s smokeable. Curing is important because it brings out the taste and flavor of marijuana. Curing has other benefits as well. You cure by keeping your marijuana in large containers. Whatever moisture is left in the buds will become equally distributed throughout the plant matter, drying out some parts and rehydrating others. You don’t want completely dry marijuana. It will be like dust and harsh to smoke. A little moisture is good for a smoother smoking session.

Perpetual Growing

Perpetual growing is simply a way to grow marijuana in its different phases, concurrently. Remember the processes that marijuana goes through – seedling, vegetation, flower, and harvest. While one plant will experience all of these processes in order, this does not mean that all of your plants have to go through it at the same time.

Let’s “walkthrough” a typical grow period of 4 months or 16 weeks.

  • Week 1: Germination/Seeding
  • Weeks 2-6: Vegetation
  • Weeks 7-14: Flower
  • Weeks 15-16: Harvesting/Drying/Curing

To run perpetually, look at the longest grow period which is the flowering for 7 weeks. You could be germinating and vegging plants in that time period since it’s only 5 weeks. So, when you move your first set to flower, you’ve got 2 weeks to rest and start a new set of seeds. At the end of the flowering time for the first set, you can immediately move the second set into to flower. You’ve just shaved 5 weeks off the initial 4 months. You can’t rush flower but you can start a third set in another 2 weeks.

It’s easier to view the process on a calendar

  • 01/01: Germination/Seedling
  • 01/08 – 02/05: Vegetation
  • 02/06 – 03/19: Flower
  • 02/20 – 02/27: Germination/Seedling of 2nd set
  • 02/27 – 03/20: Vegetaion of 2nd set
  • 03/19 – 04/02: Harvesting/Dry/Cure
  • 03/21 – 05/09: Flower of 2nd set
  • 05/09 – 05/23: Harvest/Dry/Cure of 2nd set

As we can see, the time between the harvests of the first and second sets of crops is less than 2 months (April 2 to May 23) as opposed to 4 months if we started the cycle again from Week 1. If we continue to run the veg, flower, and harvest at basically the same time, the next set of crops will be ready to smoke by July 13th and again by September 3rd. In this way, a grower can literally pull 5-6 crops every year as opposed to 3 crops the regular way (April, August, December).

Grow Your Own: Item List/Seeds

Continuing from yesterday, I want to let folks know exactly what they should be focusing on when purchasing items to start their own marijuana grow op. Let’s get started.

Item Categories

It depends on HOW you intend to grow your buds. Keep in mind, all you do is simulate nature as best as you can.

  1. Lighting
    All plants need sun. That’s nature! However, the type of lighting needed is a different issue. Don’t bother using regular incandescent bulbs. They’re inefficient, generate too much heat and not enough light. When choosing lighting, consider heat and spectrum. Your option are Compact Flourescent Lighting (CFL), High Intensity Discharge (HID) which includes Metal Halide (MH) and High Pressure Sodium (HPS), and finally Light-Emitting Diode (LED).
  2. Air Quality Control
    In nature, there’s wind. You’ll need fans to mimic that as well as odor control and a way to cycle air if heat is an issue. You’ll need fans to circulate the air, air filtration to handle that strong odor, and intake/exhaust solution for fresh air. This isn’t a real issue with a small grow op. Cycling the air could be as easy as opening the door or lifting the lid. For larger grow ops, you’ll need dedicated intake and exhaust.
  3. Buckets or Flower Pots
    Depending on the growing system you choose to use, you’ll either need buckets or flower pots or some variation of the two. If you go with a soil or soil-less set up, you’ll need regular run of the mill flower pots. However, if you decide to enter the world of hydroponics, you’ll need to get the right type of buckets.
  4. Media
    No, I am not talking about Fox News. Media refers to the what the plant will use to anchor itself. It’s not so easy to just say soil in the 21st century. There are other options including hydroton, rockwool, peat, perlite, vermiculite, and so on. You’ll probably use a combination depending on what grow system you decide to use.
  5. Nutrients
    In nature, plants always have something to eat. It’s part of the circle of life, like Lion King. Nutrients for plants come from the decomposition of organic matter. Inside your home, you’re the nutrient provider. There are two ways to go about this – chemical or organic. Chemical nutrients are simply salts that the plant can “eat” immediately. Organic nutrients tend to be a bit messier and slower because organic material needs to be broken down.
  6. Misc
    Every grow room has to have its complement of accessories. I am not talking about a fat rope chain hanging on the front door. You may need measuring spoons, spray bottles, tubing, valves, grommets, razors, scissors, and so on. You’ll know what you need when you’re faced with a problem. Remember, it’s your first time so don’t be annoyed if you have to go back and forth constantly. Once you get your items, you won’t need to get them again.

Example Grow Op Item List

For this, I am going to use one website – Better Grow Hydro – for example purposes. Personally, I think their pricing is a bit high. Besides, it’s the internet AND a grow shop. What did I say about diffusion and paper trails? Don’t shoot yourself in the foot on that option. Let’s continue.

Well we have to start with the size of our grow room. Can’t start buying stuff without knowing what we have to work with. Let’s say it’s 4′ x 4′ footprint; 6′ in height. This is something you can build with wood from Home Depot; just be careful of light leaks. Or, you can buy a ready-made grow room. Check out the GrowLab 120.

  1. Lighting
    400 watt HPS and check out other Grow Lights. And don’t forget you’ll need a timer as well.
  • Air Quality
    Fans. Air Filter hooks into the Exhaust. Use a passive air intake.
  • Buckets/Flower pots and Media
    will depend on the type of system you want to use. Let’s go with hydroponic set up, specifically, Deep Water Culture or DWC.Seeds will go into Rockwool (media) which will be nestled in Hydroton (media) in a Waterfarm (bucket).
  • Nutrients
    We could go Organic, but let’s go chemical with General Hydro 3-part nutrients – Grow, Bloom, Micro – since it’s easier for a first timer. As you grow up in the marijuana growing game, you’ll want to invest in cloning nutrients and other stuff that will keep your plant healthy.
  • Misc
    I wish I could list everything off the top of my head that a first time grower would need but there are too many to name. As it pertains to DWC, you’ll need air pump and air stone as well as a water pump and tubing for everything. You’ll also need testing supplies to test your water’s pH (acidity vs alkalinity) and so on.

The pricing on everything may seem somewhat daunting especially since you don’t even know if you’ll do a good job the first time. But, that’s all part of the learning experience. I did pretty well my first time growing because I kept it all simple and easy. I still have some of the same stuff I used before so the cost over time gets much lower. Eventually, I came to a point where I didn’t have to even look at the garden shop again.

In fact, I haven’t been to any garden shop in two years. Besides all the time and effort pays for itself after you’ve reaped what you’ve sewn when you take the first puff of your own homegrown marijuana.

You can always start smaller, too.

Other Places You Can Find These Items

Remember, you don’t have to, and shouldn’t, get all your items from one spot or even a garden shop. Here are some other places where you can find these items:

  • Home Depot – light timers, wiring, fans; wood; garden dept – miraclegro, potting soil
  • Petland – air stones, air tubing, air pumps
  • Radioshack – digital temperature/hygrometer, microscope
  • Amazon.com – measuring spoons, scissors, digital food scale, book
  • e-conolight.com – all your lighting needs but requires some electrical work
  • ebay.com – homemade carbon scrubbers
  • bascousa.com – buckets but you will need to rig them like the WaterFarm [PDF Instructions]

Don’t be afraid to look for those out of the way mom and pop shops as well. A lot of those places don’t even register with police as places you would be buying marijuana growing supplies. In fact, I found a small paint store in NYC that sold lawn watering kits and other garden supplies. I purchased some Superthrive and 1/4″ tubing there. Totally off the grid and out of the way of any cops.

Do you see why I haven’t even stepped foot inside of a garden shop in 2 years?

A Note on Acquiring Seeds

Seeds aren’t difficult to get. However, it can be a nerve wrecking situation, especially if you have no choice but to order online which is the case for many people.

  • MexiBrick Marijuana
    Unfortunately, the best place to get seeds comes from an ounce of marijuana from Mexico.
    But, that’s not your fault; blame every federal government administration and prohibitionist since 1936. Grown under controlled conditions, you can have pretty potent, cerebral high causing marijuana. It won’t be the MOST potent but for damn near free seeds, it’s not a bad option at all. You can probably pull 20-30 seeds per ounce. Expect 50% to fail thanks to Mexican growing methods. It’s not perfect but it’s the easiest and fastest way to obtain seeds cheaply.
  • Seeds Online
    There are dozens of sites online, usually overseas, that will gladly sell you marijuana seeds. Remember the first rule about buying equipment, pay cash. Your best bet is to use money orders, not credit cards or checks. Unfortunately, the pricing can get very high for the more popular strains like super silver haze and sour diesel. However, the other strains that aren’t as popular or high-priced are just as good. Don’t get caught up in the “branding” game. If you’re a first timer you might just end up losing hundreds getting the “best”. Concentrate on the name after you’ve grown your first successful plant. Unfortunately, not all seed dealers are reputable because you are committing a crime by ordering seeds into the US. So, what agency gets your complaints if your money is stolen? Exactly, no one! And, the seed dealers know this. But, don’t let that discourage you. Surprisingly, there are more good dealers than bad. So, do your research at the marijuana forums and don’t spend too much your first time. You’re still in practice mode. Pick up something cheap and resilient to learn with.
  • Fellow Growers
    If you’re lucky enough to know another grower, you can definitely bum/buy some seeds. However, if you already know a grower, you probably don’t need to read this at all. HA! You’ll get a very viable seed stock and know exactly what kind of marijuana you should be getting. You don’t have to worry about shady dealers or potentially being arrested for ordering seeds through the mail.
  • Luck
    It’s totally possible to find a seed (one, MAYBE two) in a bag of high quality marijuana. Not every grow op is going to be perfect. Things happen and you may benefit from it. However, the viability of that seed may be very low so don’t expect too much from it. Sometimes, what appears to be a seed could really be a dud. Good luck, though.

Always expect 50% of your seeds to be males. Males do not contain much THC, if any at all. When growing marijuana they will have to culled or destroyed when identified unless you’re harvesting pollen but if you’re doing that, you don’t need to read this. But, you don’t want the pollen “impregnating” your females.

Grow Your Own: Buying Equipment

Well here we are with the first in this 4-part series. I thought to talk about security first. I want people to understand that good security habits are the first thing you need to develop if you want to grow marijuana in your home. Security starts with the first step you take which is reading this blog post.

Remember folks, you aren’t purchasing groceries. Most of what you get will be a one time purchase so practice heavy prevention early on. The badged animals know they won’t see you for another 4-6 months once you’re stocked up, so they’re looking closely all the time. ACT LIKE IT.

The Rules

  1. Pay Cash
    This is rule #1 for a reason.
    Police will not hesitate to dig into financial records – legal or not. Police are known to lie on search warrants and that’s all that’s needed to turn an innocent life upside down. Don’t give the badged criminals the benefit of paper trail evidence.
  2. Diffusion/Don’t buy everything in one spot
    The concept behind diffusion is that you have to spread out your purchases. The reason is that police stake out garden shops and that’s usually the only place you can find everything at once. So, think creatively about the items you need. Find out a way to split up those purchases among 4-5 other stores and the internet. Also, spread it all out over a few days.
  3. “Dead end” your trail
    There are some things you will have to get from the local garden shop.Expect police to be watching the location and expect to be watched and even followed for as little as bottle of plant nutrients. If you decide to include a friend, you can use their car or get that person to buy things for you. The reasoning is that if the police do try to follow, they will be lead to a home that isn’t the actual grow spot. You can pick up your items at a later date.If that is unsettling to you because you don’t want to USE a friend or you adhere to Rule #1 of growing marijuana – tell NO ONE, not even friends – make use of cabs, trains, buses, and so on. For example, if you’re in NYC, drive to the train station. Take the train one, two, or three stops to your TRUE stop. Take a cab to the garden shop. If a cop is following you on foot, he won’t be able to keep up in a cab. If he’s in a car which is most likely the case, he can’t exactly take it on the train. You can also go into another state if you’re near the border.
  4. Notice the time of year
    If you’re at the garden shop buying Ocean Forest (soil) in the dead of winter, you better have a damn good reason and be able to back it up as well. Police will not hesitate to lie on a search warrant to get into your home to see what you’re doing.
  5. Quiet and Quick
    If you know what you need and it’s small items, get in and get out as quickly as possible. For example, one day at the garden shop, a guy walked in to purchase a scalpel and rockwool cubes. I knew what he was doing (cloning) automatically. He came in, got his items, made his purchase, and left – not even a “hello” nor “good-bye”. I found it funny because the cop standing there with the “concealed” weapon didn’t even get a chance to turn around to try to ID the guy. Now, there will be times when you’ll have questions and need answers. Ask those questions in the marijuana growing forums or ask me. I’ll help you. Don’t go into the garden shop not already knowing what you want.

I know it may seem like overkill. But think about the alternatives – break your bank every week sending some other prick’s kids to college, possibly support those Mexican drug cartels, or getting caught by some cops who will only end up selling the stuff you spent so much time and effort growing.

Ok, now we’re done with that. Next “episode” I’ll discuss specifically what items you would get, how it all goes together, and a word on getting seeds.

Grow Your Own: Intro

In my efforts to teach folks how to grow their own marijuana safely away from criminals (police included), I realize most people don’t have an idea of where to start. So, I’m here to help you out with that in a 4-part series from Tuesday to Thursday, May 12 to May 15th. Today, I just want to introduce it all.

First, I’ll give you some tips on how to keep the badged thugs off your scent while you’re buying your start-up equipment. The next post will cover the specific items you may need. Then, we’ll put it all together to show you how to grow marijuana. Finally, I’ll end it the same way we started – keeping the badged thugs off your scent but while you’re already up and running.

Small Reminder.
This guide to growing indoors will be incomplete. It’s incomplete because there are too many variables to cover in each person’s situation. Problems will arise from individual to individual. For example, no one’s grow space will be the same size. Some people will need different answers to the same questions. While I think I know a lot, I don’t know everything.

I encourage interested growers to buy a marijuana growing guide, but wait until the end of this series to buy anything. There are plenty of books out there that are readily available. I also encourage people to join marijuana forums and don’t be afraid to ask questions. Remember, not every marijuana grower is out there to make money. Some people do it for medical purposes and some do it just for the love of it. They’re usually good people at these forums. They don’t want to see anyone hurt. So, they’ll gladly answer your questions just as I would.

Take a rest, relax! Tomorrow’s a new day!

Growing Marijuana: Managing Small Plants

Quick Note
If you’re looking for more on growing marijuana, start here: Anthony’s Marijuana Growing Advice. If you have any questions, feel free to email me. Make sure to send me pictures of your plants so I can see what condition they’re in. Make sure to inform me on the strain, lighting, soil/hydro, location, and any other information you may have so that I can help. Your best bet is to join a marijuana growing forum where hundreds of growers can help you with your questions.


Well folks I got a question in regards to my initial Marijuana Mondays post back in August. The commenter saw images of marijuana plants grown small scale. The first image on the left in a one-quart hydroponic grow while the image on the right is a one-ounce soil grow.

Question: How do you grow plants on a small scale?

Root Zone

First of all, to grow plants at that small scale you have to control the size of the root zone. And, if you look at the pictures you’ll notice the size of the plants in relation to the container or root zone area. Notice the image on the left in relation to the hydrogen peroxide bottle in the background. While it’s small, it’s still bigger compared to the image on the right. If you ever see grow operation busts in the news, you’ll see the plants grown in buckets, usually five gallons. They’re upwards of six feet in height. Grow a marijuana plant outdoors with the right climate, you can’t easily get plants at nine feet and I’ve seen images of a tw0-story tall marijuana tree.

Genetics

Scientifically, marijuana’s name is Cannabis Sativa. However, that tends to be misleading especially with marijuana growers and breeders. There is also Indica and Ruderalis. You can tell the difference because the plants grow differently.

  • Sativas tend to grow tall and lanky (long internodal spacing) with thin-bladed leaves. They also offer a more cerebral or “up” high.
  • Indicas are a bit shorter and stubby (tighter internodal spacing) with fat-bladed leaves. They are more common and offer more of a body high, known as the infamous “couch lock”.
  • Ruderalis tends to be a funny situation. These plants grow small by nature.

Although the root zone will control the size of the plant, depending on your space limitations, you’ll want to know what you’re working with so you can manage the plant accordingly.

Science and Breeding
This is why scientifically speaking, it’s ass backwards to consider all marijuana under one species name. For example, just because a tiger and a lion are part of the same cat family doesn’t mean they’re the same species. It’s important to know for breeders because when they cross breed the marijuana strains, they’ll be looking for specific characteristics to promote.

For example, a marijuana breeder may want to cross a physically shorter indica with the potency of a sativa. It may take many generations to get what the breeder wants. So, it’s a good thing the plant can mature in under six months.

Plant Management: Topping and Low Stress Training (LST)

As the plant grows, you use certain techniques such as topping and training.

  • In topping the plant, you simply cut the stem at the node. Shoots start to form at the internode effectively creating two stems instead of just one.
  • Training the plant is a technique used to get the plant into different shapes much like small bonzai trees and topiaries. You would basically tie the stem or branches in such a way that the plant is forced, or trained, to grow in a new direction.

As the plant grows, you tie it down in other spots to maintain the shape. Stressing also has other advantages and disadvantages. If you stress the plant too much, you may “hermie”, or cause the plant to grow male and female parts like a hermaphrodite, or just kill the plant.
Note: The image in this section is from a tutorial on LST @ International Cannagraphic Magazine Forums [link]

Light Control

A plant’s growth phases are controlled by the amount of light it gets in a 24 hour period. It’s related directly to the Spring, Summer, and Fall seasons in which there’s plenty of sun light in the beginning of Spring and through Summer and less light in the fall going into Winter. Indoor growers have to do their best to mimic mother nature’s conditions. So, a baby marijuana plant would need the increased light that Spring and Summer offer. Technically, you could keep that plant in it’s vegetative stage for years since you can control those conditions.

Normally, growers spend a few weeks in the “Spring and Summer” or vegetative phase to get big growth. However, if you want to grow small, you don’t want a great amount of growth. So, you control the lighting such that the plant is signaled that Fall is approaching and it’s time to mature. The typical vegetative phase lighting regimen requires 18 hours of light and six hours (18/6)of dark. Some growers just go for a straight 24 hours. The Fall or flowering phase is signaled when the plant is getting 12 hours of light and 12 hours of dark (12/12). So, if growing from seed or clone, simply start the plant in that Fall phase at 12/12.

Conclusion

In the first pair of images, the plants are kept small simply by controlling the root zone. Other problems can arise from this technique such as root bounding which may cause the plant to stop growing. It will require you to learn root pruning. But, there are other techniques that can help you keep the plant within the confines of the space you provide. It may seem difficult or overwhelming, but you can get the hang of it quickly.

Home
Shop
Wishlist0
Back to Top

Search For Products

Product has been added to your cart